I received a very exciting email over the weekend. As rumoured OrbX have been working on FTX England, and you can now pre-order the DRM free DVD edition from Flightstore.co.uk for dispatch on 21st December, or download it right away from The FlightSim Store.
The product covers all of England (not Wales or Scotland) but is not compatible with photorealistic scenery like GenX, so you'll have to make a choice. This is not a problem for me because, as I've mentioned before, I think FTX is far superior.
Monday, 26 November 2012
Monday, 19 November 2012
VoxATC only responding second time
Last week my VoxATC was playing up, or so I thought.
Anything I said to ATC was not being recognised the first time, but if I repeated it VoxATC would accept it on the second go and respond correctly.
It turned out that my microphone was playing up and VoxATC was actually not receiving anything that I said.
It took me a while to work this out as I had ruled out a faulty mic, figuring that if VoXATC heard me the second time the mic must be okay.
It seems that a little known (to me at least) feature of VoxATC is that if it doesn't recognise a message the first time, you can say anything the second time and it will accept it.
One thing the whole episode did make me realise was that, despite VoxATC's occasional quirkiness, flying without it is pretty pants now. It's become an indispensable part of the whole experience.
Saturday, 10 November 2012
How to complete Rod's VOR lesson
I've been working through Rod Machado's flying lessons, partly as a refresher but mainly to get to the commercial pilot and ATP lessons.
As anyone who has tried these lessons will attest, they are a mixed bag. Some are very simple to complete while others seem to end for no good reason, despite following all of Rod's instructions. Often the messages on the screen contradict Rod, and the whole thing becomes very frustrating.
The one I have found most frustrating so far such is Rod's VOR lesson, which had me calling the poor guy every name under the sun for several days.
I must have tried to complete this damn lesson over twenty times. Every time I would fly past the VOR and head north as instructed but Rod would fail to tell me to turn west for the next leg of the flight. After a few minutes I would hear the dreaded, "Since that's not going too well..." and have to start again.
I finally managed to complete the lesson last night, and this is how I did it.
The trick seems to be lining up on the VOR while Rod is giving you his initial spiel at the start of the lesson. Take a look at the map and see where the VOR is located, just north and between the two runways. While Rod's flying adjust your heading bug to about 030 and wait for the VOR to centre before setting the bug back to 360. Also verify your position visually so that you're located directly south of where the VOR is shown on the map. You should do all this as soon as the lesson starts and aim to be back on 360 or pretty close to it by the time you take control of the aircraft.
You can now fly the lesson normally. Ignore Rod and any on-screen instructions to turn left or right. Track directly north making small adjustments to keep the VOR centred. You'll know if you've done it right because as you pass over the VOR the needle will swing quickly to the right before the To From flag flips.
The needle will centre again then start to drift slowly off centre once more as you move away from the VOR. Keep making small adjustments to keep the needle centred until your DME shows about 3nm.
If you've done it right Rod will tell you to make a left turn, and the rest of the lesson should work correctly.
Take that, Rod.
Tuesday, 30 October 2012
GoFlight GF-LGT
I bought my first GoFlight module last week, a GF-LGT. I picked it up on eBay for under £40 which I'm very pleased with as the new ones are around £190!

Admittedly mine is the older model, black rather than grey and without the rudder and aileron trim or extra 3-way switch. As I have only ever used elevator trim and have plenty of switches this seems like a good trade off :)
My GF-LGT has an elevator trim wheel and a big ole landing gear lever linked to three LEDS (green is down, red is transitioning, off is up). It also has a switch for flaps.
I've decided to go with the older black GF modules as they are cheaper to pick up second hand and will match my MIP which will also be painted black.
After building and configuring several switch panels myself I was impressed by how easy it was set up the GF-LGT. After mounting the module in my MIP I dug out a USB cable and connected it up, then downloaded the latest GF software from their site.
I ran the GF config programme which detected the module and displayed a picture of it with dropdowns against each switch. All I needed to do was select the appropriate function for trim, gear and flaps and I was good to go.

Previously my gear, trim and flaps were mapped to the switches on my yoke. It's much more satisfying to slap a big lever up to raise the gear, and seeing the LEDs change from green to red gives me an absurd amount of pleasure. I really need to get out more.
Using the trim wheel is far more precise than the yoke switch, and gives a much greater degree of control. It really is a joy, and very close to the real world Cessna trim wheels I'm used to.
The flaps switch is a bit meh though. It's a feeble little thing which seems to be configured in reverse, so UP lowers the flaps and DOWN raises them. I'm sure this is easy to correct but the switch itself will always be naff. The GF-LGT-II has a proper paddle lever for the flaps but I'm sure this is still just attached to a two way momentary toggle switch.
What I would like is a lever that can be physically positioned in a detent for each flap setting, so you can see at a glance which position your flaps are in without having to display a gauge on the instrument monitor. Of course this poses problems in a generic cockpit, as some light a/c only have two flap positions while larger aircraft have five or more.
A project for the future might be to make a lever like this, or perhaps adapt a throttle quadrant for the job. I'm sure some imaginative labelling and profile specific axis mapping in FSUIPC will cope with all types of aircraft.
For now though I'm very pleased with my bargain purchase. I'll keep using the flaps switch (it's no better or worse than my existing one) and the elevator and gear lever (and LEDS!) are fantastic.
Highly recommended.
Next: GoFlight radio and transponder avionics modules.
Friday, 19 October 2012
A2A's B377 Stratocruiser
In my ongoing quest for realism I tried out A2A's Boeing B377 Stratocruiser, with Accu-Sim.

Eventually I think I'll hit the point where the realism starts to become too much for a simulator and become tedious, at which time I will have found my level.
As a real world pilot I do want a high degree of realism. With a C172 this is fine, as running through a few short checklists is not too time consuming. Even my beloved DC-3 is do-able, but when flying something a complex as the B377, which had a four man crew, compromises must be made.
For example, I printed off 18 pages of B377 checklists, which involve all four crew members. I haven't sat down and run through every item yet, but with only an hour or two in the evening to actually fly, I don't want to be spending half this time hitting switches.
Fortunately A2A offer an add-on called Captain of the Ship, which gives you full interaction with your crew and allows you to hand off tasks to them. I haven't tried this yet, but it looks like a good option to maintain a high level of immersion and still get off the ground in a reasonable time.
The B377 is also the first four-engined aeroplane I have flown. Initially I was planning on limiting myself to single- and twin-engined types but I have changed this policy allow myself to fly pretty much any aircraft, which means also changing my switch panel designs to accommodate four engines.
I had a crack at reconfiguring my panel designs over the weekend, and it looks like I will need a second Bodnar card in order to support four of everything instead of two. I am currently trying to split it all into two sets of panels so I can do one set immediately and the second when I buy another card.
This is the revised engine start panel, which will allow me to control the mags and start up to four engines. I'll have to write a LUA script for FSUIPC to make this work.

Monday, 15 October 2012
Centre pedestal progress
Finding time to work on the hardware side of things is difficult, particularly now that the evenings are dark. I need a proper workshop with electricity. One day, maybe...
I did manage to grab a couple of hours on Sunday morning to work on the centre pedestal. I had already cut out the sides, which are now fixed to the base. The throttles are mounted and I think it's looking pretty good. I'll live with it for a week before adjusting the throttle position (they need to come down a little) and adding a front and top.


I did manage to grab a couple of hours on Sunday morning to work on the centre pedestal. I had already cut out the sides, which are now fixed to the base. The throttles are mounted and I think it's looking pretty good. I'll live with it for a week before adjusting the throttle position (they need to come down a little) and adding a front and top.


Wednesday, 10 October 2012
Blocky gauges problem - Solved
I've been having problems with gauges looking torn and pixellated when I dragged them to my second monitor.
It turns out that in FSX Settings I had that monitor set to 1024x768, instead of its native resolution of 1680x1050, so no wonder the gauges were looking big and nasty.
I feel pretty stupid as I had set the correct resolution of my main view display, but after adding the second monitor I hadn't thought to use the dropdown to select the new monitor and set the correct resolution on that one as well.
Still, it's working fine now :)
I spent a couple of hours last night configuring the new RealityXP Flightline T gauges on a custom panel with a black background in the default C172. I was trying to get them to display at 8cm x 8cm so I could cut some holes in a plywood mask to allow them to show through.
Because of its age FSX assumes all monitors are 4:3 and consequently round gauges appear oval unless you edit their size in the panel.cfg.
After some experimentation I got the basic six FLT gauges displaying correctly in full screen on the second monitor. They're still not perfect, with some minor tearing on some of the instrument markings and lettering, but they are a big improvement on the default gauges.
Next step is to create a generic default panel that will work for all the single engine aeroplanes in my hangar, then do the same for the twins.
Tuesday, 9 October 2012
Maiden with Buffalo Airways Virtual
I got my registration details through for Buffalo Airways virtual airline (BFL), so I thought I'd have a weekend off from cockpit building and just fly. I chose a simple route from their main base in Yellowknife to their secondary base about 150nm away in Hay River. On the BFL website I 'bid' on this route (which allows you to be paid virtual dollars for completing it) and got it.
I also downloaded the BFL ACARS app, which tracks your flight and submits a PIREP to prove you've done it. This is a nice piece of software and only took a few minutes to set up using the very clear tutorial.
Although I have downloaded the free BFL C-46 and DC-4 I thought I'd start with something I'm familiar with, so I fired up my MAAM-SIM DC-3 which comes with a Buffalo Airways livery.
I created a flight plan in FSX and also entered the route on my real world GPS, then positioned myself at Yellowknife and started my other new toy, VoxATC UK.
I took the plunge and bought this last week after trying the demo back in the summer. It's pricey (my most expensive purchase so far other than hardware), but lends a whole new dimension to flights by replacing the default FSX ATC and allowing you to speak to controllers and have them respond. I'll post my thoughts once I've given it a full shakedown.
The flight itself was uneventful, just one straight leg south over the enormous Great Slave Lake. VoxATC performed well at Yellowknife and offered traffic advisories en-route, and the GPS tracked my progress all the way.
This was the first longish (just over an hour) flight I've taken in the MAAM-SIM DC-3 and it certainly keeps you busy staying on heading and altitude. The trimming was tricky, and it didn't settle down the way some of the others planes do.
After an acceptable landing I shut down and used the ACARS app to submit my PIREP, which was approved the next day. I logged 1.1 virtual hours and earned eleven virtual dollars. I'm not sure what to do with my new found wealth, but in another 8.9 hours I'll be promoted from Rampie to Flight Attendant, so perhaps I'll save it for a party.
I can see the attraction of flying for a VA, but I can't see myself doing more than one flight every couple of weeks. There are a lot of interesting routes on offer, so it's always something to do if I'm stuck for ideas (which is NOT a problem at the moment).
Monday, 8 October 2012
Fame at last
Chris Evans was discussing flight simulators on his Radio 2 breakfast show this morning, so I texted in and got a mention :)
Friday, 5 October 2012
GenX vs OrbX
For my UK flying I have been using UK2000 VFR Photographic Scenery Generation X, with Treescapes and the demo version of VFR Airfields (which fortunately includes Wellesbourne). Judging by Wellesbourne the airfields are excellent in terms of accuracy.
GenX is the first photoreal scenery I've used and I have mixed feelings. Before buying it I read a quote saying that above 800 feet it looks amazingly realistic.
I have to disagree with this. For me, at anything under 2000 it looks very 2D and just like what it is: a big photo. This makes take-off and landing a little disappointing.
However, at above 2000 ft it looks great, although the shadows from the trees can be a little jarring at times. It's particularly good with poor weather and low visibility.
Treescapes is a great product and helps enormously, positioning thousands of trees to give the landscape a more 3D feel, and mitigating the shadow problem to some extent by plonking 3D trees and woods on top of their flat photo texture.
Landclass accuracy seems good too, with the roads, railways and rivers I'm familiar with all in the right places.
But I don't have to limit my virtual flying to Blighty. Two of the great advantages FSX has over real world aviation is that you get to fly in aeroplanes and to places you would never get a chance to experience in RL.
In FSX I enjoy bush flying around Seattle, Canada and Alaska, and a while back I installed OrbX's free demo of their excellent FTX Pacific NW product.
I was very impressed, so this week I took the plunge and installed the full version, together with a couple of their free add-on airports.
After a quick hop from Vashon Island to Seattle-Tacoma and a buzz around Bowerman I was blown away.
For me, this is far better than photoreal scenery, with fantastic textures, buildings and trees right down to the moment your wheels hit the ground.
OrbX offer most of Australia and New Zealand, and a large amount of north western North America.
I would recommend the UK2000 products, but for me OrbX is streets ahead.
Ice Pilots NWT - Recommended
I do enjoy flying the old WW2 vintage piston pounders, and on Monday my trawling of the web turned up a TV programme which had previously passed me by.
Ice Pilots NWT is a Canadian show about Buffalo Airways, which flies old DC-3s, DC-4s and C-46s (to name a few) to remote locations in the Northwest Territories.
It's real Tales of the Gold Monkey stuff, and well worth a watch.
I found the narration a little grating at first. It's one of those annoying shows where the narrator constantly repeats what you've just watched two minutes ago, I can only assume for acute amnesiacs or the hard of understanding. Despite this it's great fun to watch, and a vintage plane buff's dream.
Ice Pilots is now into its third season, and I believe the show airs on Quest in the UK. I'm currently working my way through season one, which certainly removes the rose-tinted spectacles and exposes the harsh reality of being a freight dog in such a remote area.
There's even a Buffalo Airways virtual airline which I've registered with. I've never joined a VA before so I'll post how it's going.
Monday, 1 October 2012
Planes and plans
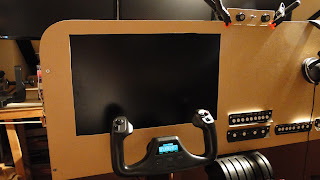
The centre console is in place, albeit temporarily for testing purposes. I'll live with it for a week or two but I've already improved the design so unless anything changes I know what I'm doing with it now.
This has meant I've got my throttle back in operation and can fly again. Most of the latter part of last week and the weekend was spent testing and checking out my new Carenado PA28 Cherokee. It's a very agile little plane, which Hugo enjoys using for tree hopping.
I also added to my growing DC-3 fleet with the Just Flight version. This is a beautiful aeroplane to watch from exterior view, and sounds great. The VC is not so good though, being far too pristine. This is not a major problem for me as I use the 2D cockpit, but even that is just the default FSX one which is a little disappointing. My ideal DC-3 would be the Just Flight version fitted with the MAAM-SIM 2D panels, but the Just Flight DC-3 is now a firm favourite anyway.
On Saturday I spent a very useful fifteen minutes adjusting the height of my external monitors. This has enabled me to move the whole cockpit further in under the camber of the roof, giving me more room and allowing me to fix the overhead panel in place. This just has the engine management module on it at the moment, I still need to add the engine start module.
The side console is on hold as it's basically a glorified keyboard shelf and since adding the base I don't really need the stability it would give the cockpit anymore.
So now the two things at the top of the job list now are gauges and the glareshield.
I'm fed up with using the default 2D cockpits on my instrument monitor as these appear ugly and pixellated. I'll have a play with editing their dimensions but I suspect I will have to buy the RealityXP gauges to see how these look. Unfortunately these do not include engine gauges so I'll have to source these elsewhere if I can't get the default ones looking okay.
My plan for the glareshield is to curve some bendy MDF or flexible plastic around the curved edges of the MIP, then carve a block of insulation foam into a gently curving top. Once it's all covered in black vinyl I'm hoping it will look okay.
I'll mock something up in cardboard first to see what it looks like.
Wednesday, 26 September 2012
How to fix multi monitor panel display problems
I use three 24" monitors for my external view, and a 22" for my instruments.
When I first tried opening different planes' 2D panels to drag over to the 22" monitor I found that some were stretched across all the monitors or, worse, didn't appear at all and caused the FSX cursor to do its spinny thing.
There is a simple fix for this.
Go to the main FSX folder and into SimObjects, then Aircraft.
Find the folder for the plane you want to edit and go into its Panel folder.
Take a copy of the panel.cfg file (naming it panel-orig.cfg or similar) and open the panel.cfg file in Notepad.
Find the panel you want to fix (for example [Window00]), and edit the following line:
[Window00]
window_size=1.000, 1.000
Change it to:
[Window00]
window_size=0.333, 1.000
If the line isn't there just add it.
This will reduce the width of the window to a third of the display (ie. one monitor if you're using three).
Save the file and fire up FSX to check that your panel is now displaying correctly. If you experience any problems you can just restore the original panel.cfg file.
You may also find that the external view is squashed up into the top part of the screen.
To fix this go back into the panel.cfg file for your aircraft, and look for the following section, usually right at the bottom:
[Default View]
X=0
Y=0
SIZE_X=8192
SIZE_Y=4000
Change the SIZE_Y to this:
SIZE_Y=6144
Note that these fixes may not work for every plane. For example I have found big problems with the default Beaver that I have yet to overcome. I suggest you try one plane at a time, and if you experience problems just restore that plane's cfg, check the problem has gone, then try a different aircraft.
To avoid having to undock and drag your panel every time you want to fly, you can save the flights with the panel in the correct position on your second monitor. The steps are detailed in this post.
There is a lot more information on editing cfg files here.
Saving panel position on second monitor
I use this process to avoid having to undock and drag panels to my instrument monitor every time I fly.
I've done this for all my favourite aircraft, so when I want to fly I just load the saved flight for the aircraft I want and use the menu to move it to another airport if necessary.
I use the following convention for naming the saved flight, so they're always at the top of the list and easy to find:
000 Type Location
000 C172 EGBW
- Start FSX.
- Go to Free Flight.
- Select the aircraft, aerodrome, weather and time I want.
- Start the flight.
- Alt-Enter to windowed mode.
- Bring up the instrument panel I want. This varies from plane to plane. For example, aircraft with IFR panels like the default C172 and Baron are excellent, but others like the good old Goose have a lot of blank space for the outside view. If, like me, you are using multiple monitors for the outside view you will probably need to edit each aircraft's panel.cfg file to get the panels to display correctly.
- Undock the panel and drag it to the second monitor.
- Save the flight.
I've done this for all my favourite aircraft, so when I want to fly I just load the saved flight for the aircraft I want and use the menu to move it to another airport if necessary.
I use the following convention for naming the saved flight, so they're always at the top of the list and easy to find:
000 Type Location
000 C172 EGBW
Centre console
I've had to rethink the centre console. I was planning on having it 30cm wide so that I could store a joystick in it when not in use. After some testing it turns out that this is just too wide, as I suspected it would be.
The new plan is to make an 18cm wide enclosure, just big enough to mount my two Saitek throttle qudrants side by side. I think this could extend out a little way from the MIP, giving a flat surface on which to use the mouse or the joystick when necessary. I won't be able to store the joystick inside it, but that's not the end of the world.
I cut some MDF last night and dry assembled part of the console. I immediately saw that some tweaking is needed so I still don't have working throttles. The frustrating thing is that this isn't a big job, but I can only cut outside after work, which doesn't give me much time before it gets dark each evening. Also, it's lashing with rain today.
I haven't been able to fly since Friday, and I'm getting twitchy. I may have to jury right the throttles just to get back in the air until the centre console is finished.
Weekend progress
I made some good progress this weekend, but obviously didn't get everything done (that was never going to happen).
After a quick trip to B&Q for a couple of sheets of MDF and some sawhorses I took the cockpit apart and carried it all down to the back garden, where it was sunny for once.
I cut 10cm off the depth of the top of the cockpit so it was the same width as the supports, and trimmed the edge where it was a little too long. I've based the cockpit measurements on a width of 6' (as MDF comes in this length it reduces cutting) but the top was an old piece of timber I had lying around, so it was a little too long.
The sawhorses made the cutting so much easier, as did a new wood blade for my jigsaw. I'm getting pretty straight cuts now.
Anyway, with the top reduced to 6' wide by 40cm deep (forgive my mixing of measurement systems) I cut the 6' x 4' sheet of 12mm MDF I had bought to the same size. I then trimmed the three upright supports so that the height of the whole thing would be the same as the back, which is made of 6mm MDF.
Once it was all reassembled it was much less wobbly, even without the battens I had been using to brace the upright supports when it didn't have a base.
I also reattached the MIP supports to the top using angle brackets instead of the Heath Robinson battens I had used before.
I doesn't look much different, but the whole unit is more stable, 10cm less in depth, and a couple of centimetres lower. This gives me a lot more room behind me, so I can sit further back and not be so cramped.
I decided not to make the monitor support until I know exactly how high it needs to be.
The consoles have had a rethink too, I'll post separately about them.
I've added some pictures.
Monday, 24 September 2012
How to make a lighting panel using toggle switches
I did this for FSX but it should work for FS9 as well. No promises though, as I haven't tried it.
To simplify the instructions I'm going to assume that you are using SPST toggle switches similar to these, and red and black coloured wires (although they can be any two colours, as long as they're different).
Shopping List
Instructions
First plan the layout of a simple panel. I did a lighting panel first (top one).
 Mark out the material you will be using for the panel and drill a hole for each switch.

This is actually my engine management panel. The holes are a bit wonky but it's not too bad when the switches are in place. Try to be as accurate as possible when drilling though.
Fix the switches in the holes and figure out how long you need your wire to be to reach the BU0836X comfortably. Cut a length of each coloured wire and connect the red wire to the terminal for the ON position on the switch, and the black wire to the OFF position terminal.
Image
I use switches with male Lucar type spade connectors on the back, which means I can connect the wires using female Lucar connectors which makes it easy to disconnect them and move them around if required. You can always just wrap the wire around the terminal and secure it with electrical tape, but this isn't an ideal long term solution as the wires will work loose over time. Soldering is another more permanent solution.
Choose an input on the BU0836X card (I started with 32 and worked backwards, as I have seen a report of input 1 interfering with Saitek devices). Push the other end of each wire into the connectors on the card. Make sure you strip a short (5mm) length of the insulation from the wires first to ensure a good connection. I had a little trouble getting the wire in at first. There's a particular angle that works well, but if have trouble try gripping the wire with pliers until you get the hang of it. If you need to release the wire just press down on the top of the connector and it will come free.

Assuming you're using input 32 the red wire from the ON position on the toggle switch should go to the B32 connector, and the black wire to the ground (GND) next to it.
Plug the BU0836X card into your PC using the USB cable, and fire up FSX.
Start a flight and hit Alt to bring up the menu. Choose FSUIPC from the Add-ons menu item, and select the Buttons & Switches tab.
Now for the fun part. Click one of your switches and it should appear in the Joy# and Btn# boxes. Then check the box on the right labelled Select for FS control and the dropdown labelled Control sent when button pressed will activate. Choose the function you want your switch to perform from the dropdown menu. For example, to have your switch toggle the beacon select Toggle Beacon from the list. (If you can't find the entry for an item try looking under T for Toggle, as many of them are in there.)
Next select the same toggle command from the Control sent when button released dropdown, so that the switch will toggle off when released. (See A note on SPST vs SPDT switches below.)
Click OK to return to your cockpit and observe the virtual version of your switch. Flick your real life switch, and the one on-screen should toggle as well. Switch to an external view and and watch the result :)
Note: If you are doing this on FSX's default Grumman Goose like I was, the lights are all messed up and need fixing. I'll post a tutorial on how to fix this.
Rinse and repeat for the rest of the switches on your panel.
This will give you a functioning switch panel for under £100, which increased my immersion levels considerably. After the initial outlay you can create more panels with very little outlay (I've started getting switches on eBay now for a fraction of the Maplin price). I have 3 panels and counting now, and lots of inputs left on my BU0836X card.
Of course, the panel itself looks grim - bare wood with pencilled in labels. There are a number of ways of tarting them up which I'm currently looking at, so I will post the results of my attempts when I have something worth looking at.
If you're still reading you might be interested in my tutorial on how to create an engine start panel using rotary switches, coming soon.
Happy switching.
A note on SPST vs SPDT switches
Because of the way these switches work you need to tell FSUIPC to do something when they are released. The drawback of this is that you need to start each flight with the switch in the same position as those in the on-screen cockpit. If you start with the beacon light off on your RL panel and on in the cockpit, then when you click your RL one on the on-screen one will switch off. This isn't a problem as long as you always start with a cold and dark cockpit like I do, and remember to shut down after each flight (or use a checklist).
If you use a SPDT (Single Pole Double Throw) ON-ON switch instead you will have 3 terminals, one for each ON position and one for ground. This means you can assign a specific switch position to each (eg beacon on and beacon off, instead of toggle beacon). The downside here is that it uses two of your precious BU0836X inputs instead of one, effectively halving the number of switches you can have before needing to buy another card.
To simplify the instructions I'm going to assume that you are using SPST toggle switches similar to these, and red and black coloured wires (although they can be any two colours, as long as they're different).
Shopping List
- A Leo Bodnar BU0836X interface card - £49.99 + £4.99 delivery
- An A to B USB cable to connect the card to your PC - £4.97
- A registered version of FSUIPC - 28.56EUR
- Some simple SPST (Single Pole Single Throw) ON-OFF toggle switches (10A Toggle SPDT A, Order Code: JK27E) - £3.49 each (much cheaper on eBay)
- Two lengths equipment wire (any gauge), of different colours. I use red and black.
- A drill with a suitably sized bit for your switches (I believe 12mm holes are pretty standard for toggle switches) - £10 for the bit (I already had a drill).
- A piece of hardboard, plastic or thin MSF to use as the panel. I used offcuts cut to 7.25" x 2", the same size as GoFlight panels. (You could get away with using thick cardboard to practice with, then you wouldn't even need the drill.)
- Electrical tape.
Instructions
First plan the layout of a simple panel. I did a lighting panel first (top one).


This is actually my engine management panel. The holes are a bit wonky but it's not too bad when the switches are in place. Try to be as accurate as possible when drilling though.
Fix the switches in the holes and figure out how long you need your wire to be to reach the BU0836X comfortably. Cut a length of each coloured wire and connect the red wire to the terminal for the ON position on the switch, and the black wire to the OFF position terminal.
Image
I use switches with male Lucar type spade connectors on the back, which means I can connect the wires using female Lucar connectors which makes it easy to disconnect them and move them around if required. You can always just wrap the wire around the terminal and secure it with electrical tape, but this isn't an ideal long term solution as the wires will work loose over time. Soldering is another more permanent solution.
Choose an input on the BU0836X card (I started with 32 and worked backwards, as I have seen a report of input 1 interfering with Saitek devices). Push the other end of each wire into the connectors on the card. Make sure you strip a short (5mm) length of the insulation from the wires first to ensure a good connection. I had a little trouble getting the wire in at first. There's a particular angle that works well, but if have trouble try gripping the wire with pliers until you get the hang of it. If you need to release the wire just press down on the top of the connector and it will come free.

Assuming you're using input 32 the red wire from the ON position on the toggle switch should go to the B32 connector, and the black wire to the ground (GND) next to it.
Plug the BU0836X card into your PC using the USB cable, and fire up FSX.
Start a flight and hit Alt to bring up the menu. Choose FSUIPC from the Add-ons menu item, and select the Buttons & Switches tab.
Now for the fun part. Click one of your switches and it should appear in the Joy# and Btn# boxes. Then check the box on the right labelled Select for FS control and the dropdown labelled Control sent when button pressed will activate. Choose the function you want your switch to perform from the dropdown menu. For example, to have your switch toggle the beacon select Toggle Beacon from the list. (If you can't find the entry for an item try looking under T for Toggle, as many of them are in there.)
Next select the same toggle command from the Control sent when button released dropdown, so that the switch will toggle off when released. (See A note on SPST vs SPDT switches below.)
Click OK to return to your cockpit and observe the virtual version of your switch. Flick your real life switch, and the one on-screen should toggle as well. Switch to an external view and and watch the result :)
Note: If you are doing this on FSX's default Grumman Goose like I was, the lights are all messed up and need fixing. I'll post a tutorial on how to fix this.
Rinse and repeat for the rest of the switches on your panel.
This will give you a functioning switch panel for under £100, which increased my immersion levels considerably. After the initial outlay you can create more panels with very little outlay (I've started getting switches on eBay now for a fraction of the Maplin price). I have 3 panels and counting now, and lots of inputs left on my BU0836X card.
Of course, the panel itself looks grim - bare wood with pencilled in labels. There are a number of ways of tarting them up which I'm currently looking at, so I will post the results of my attempts when I have something worth looking at.
If you're still reading you might be interested in my tutorial on how to create an engine start panel using rotary switches, coming soon.
Happy switching.
A note on SPST vs SPDT switches
Because of the way these switches work you need to tell FSUIPC to do something when they are released. The drawback of this is that you need to start each flight with the switch in the same position as those in the on-screen cockpit. If you start with the beacon light off on your RL panel and on in the cockpit, then when you click your RL one on the on-screen one will switch off. This isn't a problem as long as you always start with a cold and dark cockpit like I do, and remember to shut down after each flight (or use a checklist).
If you use a SPDT (Single Pole Double Throw) ON-ON switch instead you will have 3 terminals, one for each ON position and one for ground. This means you can assign a specific switch position to each (eg beacon on and beacon off, instead of toggle beacon). The downside here is that it uses two of your precious BU0836X inputs instead of one, effectively halving the number of switches you can have before needing to buy another card.
Unable to start the MAAM-SIM DC-3 - Solved
After installing the MAAM-SIM DC-3 I could not get the engines started. After a while I decided that this couldn't just be due to my ineptitude (which is normally the case), and a quick trawl of the net turned up the following solutions.
For each variant open up the aircraft.cfg file in Notepad.
In the [piston_engine] section change the normalized_starter_torque value to 1.5 (or 2.0), like this:
[piston_engine]
normalized_starter_torque=1.5
Changing the power_scalar value to 0.95 or higher also works, but this affects the power output of your engines, giving you an extra 10 or so knots at 2000rpm which could mess up your flight planning.
[piston_engine]
power_scalar=0.95
Some people have also found that lowering the FSX target frame rate to below 30 fixes this, but this didn't work for me.
I got all this information from this thread on Buffalo Airways.
Friday, 21 September 2012
DC-3 startup and weekend plans
Not much to report today.
I started on the lighting panel but ran out of switches. I really should start ordering them in bulk online rather than spending 5 times as much per switch at Maplin.
The engine start and management panels are working brilliantly, but I can already see some areas for improvement.
I spent last night obsessing over the correct startup procedure for the DC-3. I found this video, and then these notes which seem to be describing the same procedure.
The problem is that the default FSX DC-3 doesn't have a mesh switch, and I don't know what the energiser and engage switches are. Perhaps Jean-Luc Picard could tell me.
I might get hold of the MAAM or Just Flight DC-3s to see whether their panels are any more realistic. It needs more research first though, before I start splashing the cash.
I'm hoping to get a lot done this weekend, weather and family permitting. I want to take the cockpit apart and trim some depth off it, then reassemble it with a base and some right angle brackets to give it more stability. I'm also hoping to build the centre and left hand consoles, which should also help reduce the wobbles. (The wobbles aren't that bad, but I want it as steady as a rock.)
If I have time I'll try to knock up a proper shelf for the 3 monitors. At the moment they're on piles of books and not at all even.
That's a lot to do - let's see how far I get.
Wednesday, 19 September 2012
Engine management panel
I finished wiring up the engine management panel and tested it last night.
This has L & R generators, L & R engine primers and L & R fuel pumps.
These are all simple ON-OFF toggle switches, with the exception of the fuel pumps. I modelled these on the Beech Baron's, with three settings: HI, LO and OFF, so I used a couple of ON-OFF-ON toggles I had lying around.
After testing I think the primer switches should be momentary, as you hold them for a few seconds depending on conditions to prime each engine before start.
Also I think I wired up the fuel pump switch wrong, as I was getting ON-OFF-OFF. I may just go for ON-OFF switches here anyway, as FSX doesn't seem to support the LO position, which I've only seen in the Beech Baron in any case. I'll look into this further.
Although I've yet to come across an aircraft with both alternators and generators I wanted separate switches for both even though they share the same input in FSX. I'll use the red rocker switches I ordered on aircraft with alternators, and the metal toggle switches for older types with generators. It means using up a couple of extra inputs on the BU0836X card, but should add a touch of authenticity when flying different types.
I'm now thinking about making a fuel selector panel with a cutoff switch, but I'll do the lighting panel and MIP switches first.
Tuesday, 18 September 2012
Pictures
Here are some pictures. Not great quality as it was dark and the attic is cramped so it's tricky to get everything in.


And, behind the scenes...


And, behind the scenes...


Twin rocker switch for alternators
I ordered one of these twin rocker switches this afternoon:
At the weekend I bought two black rockers switches from Maplin for Master Battery and Avionics switches.

I wanted plain (non-illuminating) red ones for the alternators. I had a bit of trouble finding some, so hopefully these will work.
All these four switches should fit in to the left of the yoke with a bit of luck.
At the weekend I bought two black rockers switches from Maplin for Master Battery and Avionics switches.
I wanted plain (non-illuminating) red ones for the alternators. I had a bit of trouble finding some, so hopefully these will work.
All these four switches should fit in to the left of the yoke with a bit of luck.
Magneto problem - Solved
It works!
Here are the settings for FSUIPC:
SET MAGNETO 1
with the following values:
OFF = 0
RIGHT = 1
LEFT = 2
BOTH = 3
Repeat for SET MAGNETO 2
I guess you could have START = 4 as well, but I'm using a separate starter switch.
I was still seeing the switches flip to the START position sometimes, so I checked the FSX settings and found a couple of old key bindings from the previous test panel I had made. I deleted these and everything is working perfectly :)
Magneto switch problems
I made some progress on the switches last night. The engine starter panel is now all wired up (I'll need to solder the wires to the rotary switches once I'm happy it's working), and the switches are in place on the other engine panel. I'll need to finish wiring that one up and test it tonight.
Unfortunately adding a wire to the OFF position on the rotary switches did not solve the problem I was having with it skipping positions. In fact, having both switches working made it worse, with the right engine switch affecting the position of the left engine switch.
I'm sure the switches are wired up correctly as each position shows up as a separate button press in the Windows Game Controllers tool.
I suspect it's either a conflict between FSX and FSUIPC, or I'm just using the wrong control command in FSUIPC.
I checked FSX and couldn't see any conflicts, so tonight I will try using the 'Magneto x Set n' command (where x = engine number and n = 0 for OFF, 1 for RIGHT, 2 for LEFT, 3 for BOTH). Currently I'm using 'Magneto 1 Off', 'Magneto 1 Right' etc.
If that fails I'll try setting offsets.
Sunday, 16 September 2012
Engine start panel
On the way to the airfield we stopped at Maplin and I picked up some rotary switches and knobs for the engine start panel.
Back home I cut out the overhead panel and made a couple of 7.25" x 2" switch panels to fit to it. My hand sawing is improving but the edges are nowhere near as straight as I'd like. I'll need to think of a better way of doing this, particularly as I need to add text to the panels. One thing at a time though.
I drilled out the engine start panels and fixed the two rotary switches for selecting mags on left and rght engines, and a momentary toggle switch as a starter for both.
While Kerry was watching Downton Abbey I wired up the starter and left engine rotary to my Leo Bodnar card, and hurried up to the attic like a kid at Christmas to test it. I love starting the engines this way.
I sat in a Beech Baron 58, looking at the virtual version of the table I'd had lunch at earlier, and clicked the left engine switch round to BOTH. Then I looked over at the engine and clicked the starter. The prop span and the engine burst into life with a satisfying roar and a cloud of exhaust fumes. It's the little things :)

So the switches worked fine, another testament to the excellent BU0836X card. The only problem was that I hadn't wired up the OFF position on the rotary switch. I found that this caused problems when switching mags, going from OFF to R, then BOTH, missing R. This makes sense when you think about it. With the toggle switches on the lighting panel I saved one precious BU0836X input on each switch by assigning each light's toggle function to fire when the switch was ON, and when it was released (see below). You can't do this with a rotary switch as then each position is released FSUIPC doesn't know which direction it's going in.
I'll grab a screenshot showing this.
It's an easy fix though; just wire up the OFF position. It just means I have to use up another input on the BU0836X card. I saw something about using the card's hat switch for rotary switches, although that may have been rotary encoders. I'll check it out and see if I canuse that instead, as 2 rotary switches with 4 positions (OFF, R, L and BOTH) on each will take 8 of my 32 inputs (my maths is good.)
I'll try to do a post explaining how I wired the rotary switches.
Anyway, that's a job for tomorrow night.
EGBW visit
If you want a decent fry up there are few better places than an airfield caff. I took the family over to my local field, Wellesbourne Mountford (EGBW), for lunch. We sat outside next to the taxiway and watched the planes landing and taking off on runway 23 while demolishing a full English.
I took my crappy old airband radio and tuned into Wellesbourne Information (125.025) so we could listen to the chatter. Hugo and I really enjoyed ourselves, and the girls at least had a nice meal out of it!
Afterwards we popped into my old club at South Warwickshire Fying School and I had a chat about what it would take to renew my PPL. As I thought, I'll need a class 2 medical, a few hours refresher training and a flight test.
I'll have to think about this. Flying is not a cheap hobby, and if I'm going to start again I want to make sure I'll get enough out of it to warrant the expense.
The kids sat in my favourite Cessna 152, G-BHUI, although Bea was more interested in Pussycat, the club cat.
Flying the Beaver
So, we fired up FSX this morning so I could show Hugo all the good stuff I did to the panels last night and...disaster!
When we opened the saved flight for the Baron 58 the main window was no longer stretched across all 3 monitors, but was the same size as the actual FSX application window the main interface that opens when you start FSX and plays that godawful music which I actually kind of like now). Also, although the main panel was still undocked and on the instrument monitor, it was squashed into the left 10th of the screen. The cursor was doing that spinny thing as well, which is never a good sign :(
Despite numerous restarts I couldn't shake the problem, which affected all aircraft, and to add to my annoyance FSX stopped shutting down properly. The window would close but it was still running in Task Manager.
To cut a long story short I figured it must be something to do with the panel.cfg edits I'd been making last night, probably one of the last couple as it had been working like a charm earlier on. I restored all the original cfg files and hey presto, FSX started playing nicely again. I had my suspicions that it was the Beaver causing all the trouble and, sure enough, when I started using my modified file for this plane FSX freaked out again.
I've restored the C172, Baron 58 and Goose for now, and I'll work through the rest later. I'll do one at a time and test carefully to catch any problems right away.
While looking at the Beaver's panel.cfg I remembered seeing a warning when I loaded it into FSPanelStudio. I tried again and got a message telling me that two panels had the same name: FLAPS_PANEL.
Wondering if this was the cause of the problem I edited the file, changing the first FLAPS_PANEL to FLAPS_TRIM_PANEL (I got this from here), and the second to TRIM_PANEL, but it made no discernable difference. I can't even load the plane for Free Flight without the cursor going mad.
More research is clearly required, as I love flying the Beaver (that sounds like a euphemism), but it's not a priority right now.
Saturday, 15 September 2012
Consoles and config files
I measured up for the pilot-side and centre consoles today, and modelled them in Trimble SketchUp while we watched Strictly (obviously I put the laptop away for Doctor Who).

The idea is to improve stability (make the whole thing wobble less) and also have somewhere to store and rest the keyboard on my left and the mouse on my right. The throttle quadrants will also be fitted to the centre console. If this works I'll add another console on the right of the co-pilot.
Looking forward I will also be able to store a military style throttle on the left, perhaps fixed to the top of the console so it can be lifted out and turned over when neeed. Similarly, the centre console is big enough to store my Microsoft Force Feedback 2 joystick. This old beast can be placed on the top of the centre console when required for modern military sims, or on a board in my lap if I fancy a bash at the Hun in RoF or CFS.
The problem is the width of the centre console. It needs to be 30cm wide to hold the FF2 and with the current office swivel chair I'm using I think this is going to crowd me and impede access to the pedals.
I even took the arm off the chair to gain a few centimetres, before realising that the arms hold the back on! I put it back quickly.
A couple of solutions spring to mind. I could always increase the width of the cockpit a little, or I could get a narrower chair without the annoying arms. I'll have to measure up the width of the seats in my knackered old 1996 Vectra. It can't last much longer and I can knab them before the old girl goes to the scrapyard.
One of the things I'm really enjoying about this whole cockpit building process, is that you try stuff, and if it doesn't work you just try something else. As part of my centre console ponderings I am now thinking about extending the console in under the cockpit as a more stable centre support. I'm pretty sure this the way forward, so I'll have to modify the design before I go and buy the MDF next Saturday.
I also thought some more about my switch panels. I am now going to put the engines controls (2 panels) on an overhead which I can fix to the slope of the attic roof.
I'm also going to use rocker switches for the Master Battery and Avionics, and probably both alternators, which should fit either to the left of the yoke or going down the left of the instrument monitor.
I may put the Radio/GPS switch and possibly Autofeather there too.
Again I stayed up far too late, fiddling with the panel configs for my favourite aircraft. These have been modified to allow the main or IFR panels to display correctly over 3 screens, and be undocked and moved to my instrument monitor. I've described the changes in this post.
It took me a couple of hours of fiddling and testing to get the following aircraft working:
C172 (I always start with this one.)
Mooney Bravo (Hugo's favourite)
King Air
Beech Baron 58
Goose
DC-3
C-47
DH Beaver
The only problem I found was a weird one. When I was working on the Beaver I tried to place it on a water runway at Kenmore Air Harbour, but it ended up in the middle of some buildings. I tried with the Goose as well and had the same problem. It was 2am by this time so I gave up and went to bed, more than satisfied that the rest of the aircraft were working perfectly.
Friday, 14 September 2012
VoxATC and VATSIM
I'm still looking for radio stacks. I found a bit of a bargain on GoFlight modules but funds are low at the moment so I think I'll leave it for now.
I will splash out on VoxATC UK though. I tried the demo a while back and apart from the robotic voices I really liked it. Having to actually speak to ATC really adds to the flight experience, and I believe there are better voices available.
I've been holding off buying it until I could check out VATSIM, an online multiplayer environment with real people doing the ATC. Although, obviously, it's far better than any computer generated ATC, the drawback is that with only 30 or 40 controllers on at any one time you are severely limited in where you can fly and receive a service. It's also very geared up for airliners, although I understand there are a fair number of people doing VFR flights in there as well.
With this in mind I plan to use VoxATC for offline flying, and VATSIM for online.
Until I get a radio stack I can use Multi Crew Experience (MCP) to handle the radios by voice command, to save the pain of using the mouse.
On the subject of VATSIM, a strange thing occurred when starting FSX this evening (I'm getting used to strange things happening to FSX). I installed FSInn a couple of weeks ago so I could take a look at VATSIM (FSInn is one of the clients you can use to connect to the VATSIM environment). It worked fine for a few days and I haven't used it since.
Today, for no discernible reason, FSX kept crashing, citing FSCopilot as the reason. After a quick trawl of the web I uninstalled FSInn and FSCopilot and all was well again. I will have to reinstall FSInn at some point if I'm going to use VATSIM as the other client you can use, SquawkBox, didn't work at all for me. I guess I'll have to cross that bridge when I come to it.
Thursday, 13 September 2012
Switch panels and checklists
I stayed up far too late planning my switch panels and drawing them out in Powerpoint. I'm sure there's a better way of doing this.
I decided to start with standard panel size of 7.25" x 2", which is the same as the GoFlight modules I'm looking at. This way I should be able to cut standard sized holes for all my panels and swap them around if required.


I printed them off and stuck them to the MIP to get a feel for dimensions etc.
I'd like a panel on either side of the yoke, but there isn't enough clearance behind the MIP.
I want to make sure I have all the switches I need for all the types I fly, so I am planning on printing off a checklist for every type and doing dry runs with the dummy panels, to identify anything I may have missed.
Freechecklists.net is a great resource for this.
Wednesday, 12 September 2012
Switch panels and radio stacks
Today I have mostly been thinking about switch panels and radio stacks.
I need a way of making good quality panels, with crisp white text on a black background. There are a lot of options, so I've decided to build all the panels first in hardboard, and when I'm happy that they are all okay I'll decide on a way of making the final versions. This should give me plenty of time to research.
These are the options so far. I'll flesh out the detail later.
Sticky labels
Transparencies
Perspex (backlit)
Use a sign maker (backlit)
For the radio stack I am pretty much decided on GoFlight.
They are twice as much as the Saitek one, but look far more professional. I'll keep an eye on eBay and monitor the forums to see if anyone is selling some off cheap.
Tuesday, 11 September 2012
FS Panel Studio
I spent some time playing with FS Panel Studio tonight, and it seems to do the job. I think for now I will get everything up and running with the default FSX panels, and then create my new custom panels in FS Panel Studio using nicer gauges (either freeware or payware, or a mixture of both).
Monday, 10 September 2012
Gauges
I've been reading a lot about Project Magenta gauges, so I downloaded their GA IFR demo. There's no doubt about it, they are gorgeous.
Knowing they were pricey I contacted them for a price list, and sure enough you're looking at around £120 for one set of gauges. I'll try to post the price list for those who are interested.
I also looked at RealityXP gauges. These are very nice as well, and at about £25 far more reasonably priced. My only concern was the lack of engine gauges.
I plan to build 2 custom panels, one for single engine piston and one for multi-engine (and eventually jets as well), plus glass cockpit versions.
Ideally these panels would include all the engine gauges, Ts & Ps etc. It may be that RealityXP does include these (Project Magenta do), but I couldn't easily see from the demo and their site, so I'll put it on hold until I have time to contact them.
In the end I plumped for FS Panel Studio. I checked out the demo and then just bought it. At £16 it seemed a bargain, and everything I read agrees it's a must have tool.
Sunday, 9 September 2012
Using a real world GPS with FSX
I have my Garmin GPSMAP 295 working with FSX :) I can't believe how easy it was.
Now I need to figure out how to fix the GPS to the MIP. It came with a bracket to fix it to the yoke, which I what I used when real world flying, but even if the Saitek yoke would take the weight (which I doubt) it's not ideal as it gets in the way. I found an panel dock by AirGizmos but it's pretty pricy at $100 plus shipping and again not ideal as the screen is flush to the panel which would make it tricky to see and use.

The 295 came with another fixing intended for use in a car. This is just a sticky base, and I may be able to just stick it to the top of the glareshield (when I have a glareshield).
Alternatively I may be able to fix the yoke bracket to something behind the MIP and cut a hole for it to protrude through.
For now though, I'm just chuffed it's working. And for nothing!
I'll try to summarise how I did it.
Friday, 7 September 2012
Starting to come together
I made some good progress after work this evening. I cut out the hole in the MIP for the instrument monitor and replaced the MIP. I fixed the monitor in place using a couple of old shelf brackets I had lying around, which seems to work really well.
I also screwed the throttle quadrants in position.
So now it's starting to look more like a cockpit.
I'll take a picture.
I only had time for a quick test, but my mind is now turning to gauge add-ons, as the default FSX ones look pretty crap when undocked on the separate monitor.
I'll add a tutorial on how to undock and move panels, and save flights.
Thursday, 6 September 2012
Radio stacks and GPS
Not much progress this evening. I reconnected the computer and checked the instrument monitor was still working after all the moving around it's had. Then I marked out the hole for it in the MIP. It was too late to cut it by the time I was done, so that's a job for tomorrow.
I also looked at radio stacks and ways to connect my real world Garmin GPSMAP 295 to FSX.
There are a number of radio stacks out there ranging in price from a few hundred pounds to thousands. I can't justify a massive expenditure on this, so I have narrowed it down to 3 possibilities.
1. Saitek
2. VRInsight
3. GoFlight
In terms of interfacing the GPS it seems that this is pretty straightforward to do using FSUIPC. I need to rig everything up and see how it works.
Wednesday, 5 September 2012
Progress on the MIP
The brace to support the instrument monitor is now in place and I cut the MIP (Main Instrument Panel) to size.
I drilled a hole in it to take the yoke shaft and fitted the MIP in place.
I'll add a picture or two.
I drilled a hole in it to take the yoke shaft and fitted the MIP in place.
I'll add a picture or two.
Tuesday, 4 September 2012
Yoke enclosure built
Back to work today after a month off, so construction will now be limited to evenings and weekends.
Tonight I fixed the uprights in place that will support the instrument panel. I also built the enclosure for the yoke and fixed a support across the top to take the primary instrument monitor.

Tonight I fixed the uprights in place that will support the instrument panel. I also built the enclosure for the yoke and fixed a support across the top to take the primary instrument monitor.

Saturday, 1 September 2012
Basic framework
Yesterday I decided I was suffering from analysis paralysis and needed to get started. For me the best way to learn is to get stuck in, so early this morning I headed off to the local B&Q and bought a 6'x4' (1220mm x 800mm) sheet of 18mm MDF.
When I got home I started work, and by the end of the afternoon the basic framework was complete.
I have a picture somewhere...
When I got home I started work, and by the end of the afternoon the basic framework was complete.
I have a picture somewhere...
Friday, 31 August 2012
Summary of progress in August 2012
I was fortunate enough to be able to take August off this year, but a fair amount of this time was spent away on holiday. Still, I managed to get a lot of research done and cleared the clutter out of the attic ready to begin construction.
I'll try to add a picture of the attic.
I also bought a Leo Bodnar BU0836X interface card and some switches, and built a test panel to control lighting. This worked great and the feeling of actually throwing a switch rather than clicking a button is fantastic. I'll add a section to the site on how I did this.

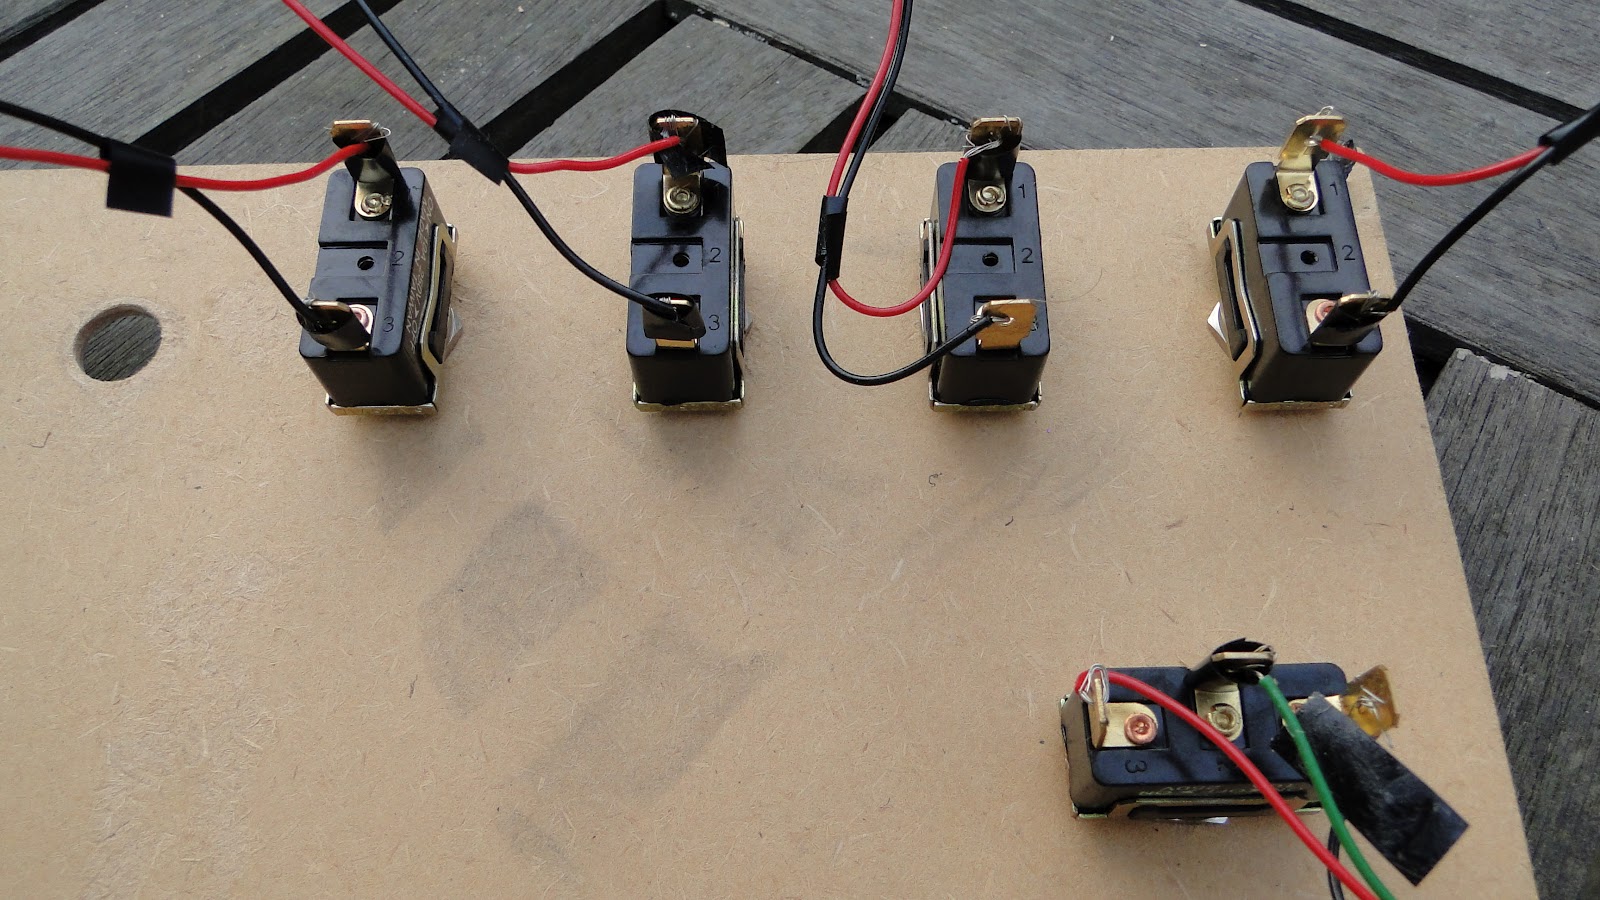
Software
I'll add more detail later:
Windows 7 64-bit
FSX Gold (Deluxe and Acceleration)
Scenery Add-ons (lots)
FSUIPC
FS Panel Studio
Windows 7 64-bit
FSX Gold (Deluxe and Acceleration)
Scenery Add-ons (lots)
FSUIPC
FS Panel Studio
Hardware
This is what I'm running:
i7 2600K (stock), 4Gb RAM, 2Tb HDD
GTX 680
x3 Samsung 22" Monitors (for external view)
x1 Samsung 20" Monitor (main instrument display)
x1 Sharp 17" (spare at the moment, possibly secondary/co-pilot instrument display)
Real world Garmin GPS295 connected via FSUIPC
Saitek Flight Yoke
x2 Saitek throttle quadrants
Saitek rudder pedals
TrackIR
Leo Bodnar BU0836X interface card
The plan
I like to fly a variety of aircraft in FSX so I need a generic cockpit. I primarily use piston engines (single and multi) but I want to be able to fly jets as a secondary consideration.
So the cockpit needs to accommodate easy switching between single and twin engine (I'll have to fudge it for 4 engine types - I rarely use them), and should be able to cope with both steam (gauges) and glass (digital displays) cockpits.
It also needs a co-pilot position as Hugo is taking an interest and it's fun to fly together.
What the hell are you doing?
My real world flying lapsed 9 years ago after my son was born. It's something I may pick up again, but this summer Microsoft Flight Simulator X (FSX) has been filling the gap. I wanted to make the flight experience as immersive and realistic as possible, so I decided to have a crack at building a simple home cockpit in the attic.
I'm a software developer and I've been building and tinkering with computers for many years, so constructing my own panels and integrating hardware with FSX holds a lot of appeal for me.
I've learned a lot in quite a short time, and the learning curve is only getting steeper. There's a wealth of information out there on building a simpit or home cockpit, so I thought I'd add my experiences to the mix in case it helps anyone else along the way.
Subscribe to:
Posts (Atom)